



Uploading a Digital ID Photo to an Application Portal: Flow, Error Messages and Retries
Even a flawless photo can be bounced by an application portal, because portals check two separate layers: the technical properties of the file and the content of the frame. This guide gathers the upload flow portal by portal, shows which error message comes from which layer, and tells you what to change before you retry. Each country's numeric specification lives on its own page; this one covers the operation itself.
- At home, no studio
- Free analysis
- ICAO 9303
- AI-Powered

Key takeaways
- A portal checks two layers separately: the file (extension, ratio, orientation, colour profile) and the content of the frame
- An "invalid format" error is almost always about the file — you need a re-export, not a reshoot
- Renaming a file to .jpg does not convert it; a HEIC capture has to be genuinely converted
- Keep your own copy of whatever you upload; some portals never show the uploaded document back to you
Where is it used?
This guide is for you if you already have a frame that follows the biometric rules but the application portal refuses the file, or if you do not know where in the flow the photo is asked for: it shows which portal wants the photo at which stage, whether an error comes from the file or from the content, and what to change before retrying.

Technical specifications
- Accepted upload
- JPEG, PNG, WEBP — up to 10 MB
- Minimum resolution
- Short edge 480 px (720 px+ advised)
- Analysis fee
- Free — you see the result before downloading
- Portal output
- JPEG at the exact pixel size where a spec exists
- Size-cap handling
- JPEG quality is tuned automatically to stay under the cap
- When no spec exists
- PNG at the 300 DPI-equivalent pixel size
- Colour profile
- sRGB — the US spec asks for 24-bit sRGB explicitly
- Square-ratio flow
- The US in-form upload (DS-160/CEAC)
- jpg/jpeg-only flows
- The UKVI online application, K-ETA
- Mirroring
- UKVI does not accept a mirrored or flipped file
- Transparency
- A PNG with an alpha channel can break the backdrop
- Retry method
- Re-export from the source, not another recompression
Requirements checklist
- I opened and read the portal's own specification page today.
- The file is genuinely a JPEG; I did not just rename the extension.
- The ratio is right: square where a square is asked, portrait where portrait is.
- The file is not mirrored or rotated the wrong way.
- The colour profile is sRGB; my phone's wide-colour capture is off.
- It is not a screenshot or a scan of a printed photo.
- I am not reusing the exact photo printed in my passport.
- A copy of the uploaded file is stored on my own device.
Related document sizes
Official photo sizes for documents related to this page, with pixel equivalents.
| Document | Physical size | Pixels (300 DPI) | Background | Note |
|---|---|---|---|---|
| US Passport & Visa | 5.1 × 5.1 cm (2×2 in) | 600 × 600 px | White | Square format required |
| United Kingdom Passport | 3.5 × 4.5 cm | 413 × 531 px | Cream / Light grey | ICAO compliant |
| Australia Visa | 3.5 × 4.5 cm | 413 × 531 px | White | ICAO compliant |
| South Korea K-ETA | 5 × 5 cm | 700 × 700 px | White | Digital upload |
| India e-Visa | 5.1 × 5.1 cm (2×2 in) | 350–1000 px | White | Square format required |
| Umrah / Hajj Visa (Nusuk) | 5 × 5 cm | 200 × 200 px | White | Digital upload |
| Bar Association ID | 3.5 × 4.5 cm | 413 × 531 px | White | ICAO biometric |
How it works
Uploading a Digital ID Photo to an Application Portal: Flow, Error Messages and Retries — get it right in 4 steps.
-
Pick the document you are applying for, then upload
Choosing the target document in the wizard sets the crop and the output format. The upload accepts JPEG, PNG and WEBP, and the file must stay under 10 MB.
-
Clear the content warnings in the free analysis
Expression, shadow, object and backdrop warnings surface here. This is the content layer a portal or an officer will look at; if warnings remain, the shoot needs fixing, not the upload.
-
Download the file in the target portal's format
Where a specification is defined, the file is produced as a JPEG at the exact pixel size and saved at a quality that stays under the size cap. Where none is defined, the output stays a 300 DPI-equivalent PNG.
-
Upload at the portal's photo step and keep a copy
Check the preview after uploading. Keep the file you downloaded: some portals do not let you view an uploaded document again afterwards.
From your photo to delivery: how it works
-
Take Your Photo ~30 sec
Upload a shot taken at home with your phone; no studio visit needed.
-
AI Analysis ~1-2 sec
A 478-point face mesh checks head ratio, background, glasses and expression.
-
Auto Fix instant
Background turns white and the crop is applied to the official size automatically.
-
Digital Delivery instant
Download an application-ready JPEG matching the required size and file limit.
-
Print & Shipping 1-3 business days
Printed ID photos are shipped to your address (optional).
How Do I Upload a Digital ID Photo to an Application Portal?
Whichever country you apply to, the upload comes down to four steps: pick the target document and upload the photo, clear the content warnings in the free analysis, download the file in the format that portal accepts, and submit it at the photo step of the application form. What separates portals from one another is not the content of the frame but the file itself: the accepted extension, the ratio, the orientation and the colour profile.
A portal can bounce the same photo for two different reasons. The first is the technical layer: the file is not a JPEG, the ratio is not square, the capture is mirrored. The second is the content layer: the expression is not neutral, the backdrop carries a shadow, the photo is too old. The technical layer answers instantly and automatically; the content layer is judged sometimes at upload, sometimes weeks later by an officer. Country-level numeric specifications are gathered in one place: the visa photo sizes by country page states which application asks for which size, and this guide does not repeat that data.
Where in the Flow Does Each Portal Ask for the Photo?
| Portal | Where the photo sits in the flow | File rule in the specification | Critical warning |
|---|---|---|---|
| DS-160 / CEAC (US) | Inside the application form, while filling it | Square ratio, JPEG, 24-bit sRGB | The final call rests with the consulate |
| UKVI online application | During the online application | jpg/jpeg only, vertical, not mirrored | A software-altered file is not accepted |
| ImmiAccount (Australia) | Before or after submission, as the form says | jpg and png among attachment formats; no encrypted PDF | An uploaded document cannot be viewed later |
| Canada PR Portal | One digital photo inside the portal | JPEG/PNG; a pixel range and a file cap | The rejection list includes "background is not white" |
| K-ETA and e-visa flows | Inside the application form | K-ETA accepts jpg/jpeg only | A specification can change by public notice |
The most important difference in the table is the "when". In the US application the photo is a field of the form; the upload finishes before submission and the file has to be square (the US visa photo page carries every numeric condition of that application). In the UK the photo is asked for inside the online application and the specification locks the format to a single extension: jpg or jpeg (UK visa photo). The two flows do not resemble each other; the US wants a square ratio, the UK a vertical orientation.
Australia works on a completely different logic: the photo is not a dedicated "photo field" but a document attached to the application, and the form itself tells you which document goes in before submission and which after (ImmiAccount). Nothing can be attached to a finalised application, documents are not to be emailed, and you cannot view an uploaded document in the portal afterwards — which is why the copy has to stay with you (Australia visa photo). Canada splits in two: the permanent residence application asks for one digital photo inside the portal and lists its rejection reasons openly (canada.ca), while the paper route for a temporary resident visa asks for two printed photos (Canada visa photo).
What Does It Mean When the Portal Says "Invalid Format"?
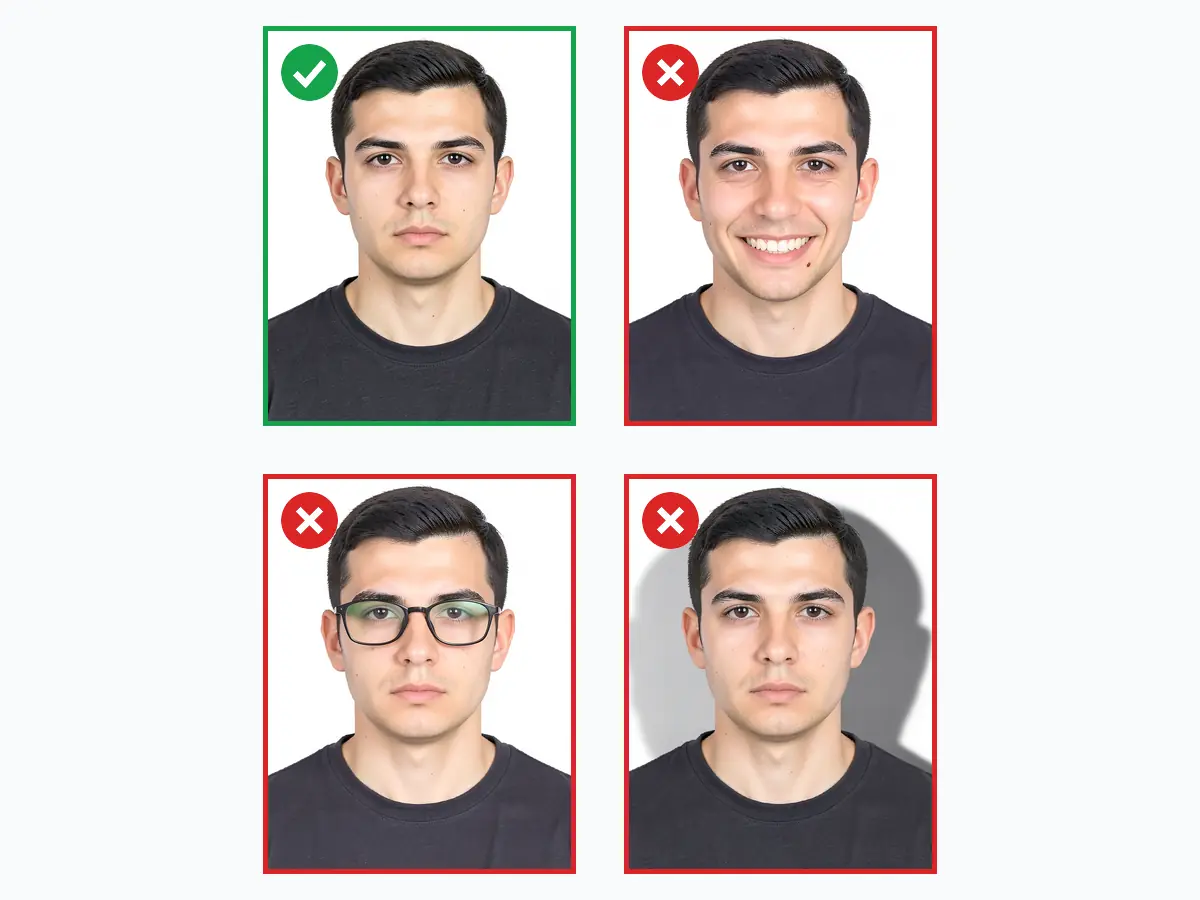
This error is almost never about the content of the frame; it is about the file. The five most common causes are the phone's default HEIC/HEIF capture, uploading a PNG where JPEG is required, sending a file with an alpha channel and therefore a transparent backdrop, uploading a screenshot or a scan of a printed photo, and sending a portrait crop where a square is expected. Renaming the file to .jpg by hand does not help — the content is still HEIC, so the portal sees it on the first read and refuses; the file has to be genuinely converted.
The second group of causes is invisible to the eye: colour profile and orientation. The US digital image rules explicitly require colour in 24-bit sRGB space (travel.state.gov); recent phones capture in a wider colour space by default, so the file can look "colourful and sharp" and still carry the wrong profile. On orientation, the UK specification states that the file must be vertical and must not be mirrored or flipped (GOV.UK); front-camera shots are saved as mirror images on some phones, which makes this clause trip people up surprisingly often. In flows that accept jpg only, such as K-ETA, a PNG is eliminated outright (K-ETA photo).
If the Upload Fails, Is My Application Cancelled?
No — a rejected file does not delete the application, it only leaves that step unfinished. What matters is reading the error correctly, because the fix is completely different. If the error is technical, no reshoot is needed; a re-export from the same frame in the format the portal wants is enough. If you were refused on content grounds, saving the file again changes nothing; the frame has to be taken again. Canada's permanent residence portal is a good example because it states the second group openly: a background that is not white, facial features that are not visible and too much glare all appear among the rejection reasons — and none of them is fixed by recompression.
Two disciplines save the retry. The first is working from the source: compressing the same JPEG over and over shrinks the file while degrading the picture, and past a point the portal moves you into the "insufficient quality" camp; every attempt should produce a fresh file from the processed source. The second is keeping a copy: some portals never show an uploaded document back to you, so if the file is lost you have to reproduce it inside the same application. This matters even more where the specification is tight; the Umrah and Hajj visa photo and India visa photo pages state at document level what such portals expect.
Can I Upload the Same File to More Than One Portal?
The same shoot, yes; the same file, usually not. Because portals diverge on ratio, pixel range and file format, one file does not fit everywhere: one application wants a square ratio while another expects a portrait crop, one accepts jpg only while another also allows png. The right method is to keep a single good frame as the source and produce a separate file from it for each application. The UK specification adds a striking clause: the uploaded photo must not be the same photo of you that is in your passport or identity card.
Applications that need prints are not outside this logic. When an appointment asks for a paper photo, preparing the digital file and the print together is the safest route; both come from the same frame and the size equivalents live on the 35×45 mm ID photo page. Set up in this order, the whole thing fits in one session: upload the frame, clear the content warnings in the free analysis, download in the target portal's format, keep the copy. The portal's own specification page always has the last word — opening it once more on upload day is faster than retrying three times.
Do's and Don'ts
Do
5- Open and read the portal's own specification page on the day you upload
- Set your phone camera to a compatible (JPEG) capture format instead of HEIC
- If you shot with the front camera, confirm the saved file is not mirrored
- Produce a separate file for each portal; re-export from the same frame
- Keep a copy of every uploaded file on your own device
Don't
5- Don't upload a HEIC file after simply renaming the extension to .jpg
- Don't send a screenshot, a photo of a screen or a scan of a printed photo
- Don't recompress the same file over and over until it drops under the cap
- Don't upload a portrait crop to a portal that asks for a square
- Don't reuse the exact photo already printed in your passport for a new application
FAQ
What photo formats are supported?
Do I need a paper photo or a digital file for visa applications?
Can I re-download my digital file later?
Why does the application portal say my photo has an "invalid format"?
If my photo is rejected, is my visa appointment cancelled?
How much does an ID photo cost? (2026)
Photo analysis and the biometric compliance check are completely free. Digital file and print prices are below — identical to the live prices in the order wizard.
Why vesikalik.com.tr?
- 10+ years of studio experience
- 5,000+ ID photos printed
- 35,000+ AI analyses run
- ~1.2 sn average analysis time
- 478 point face analysis
- 60+ document & visa standards
Uploading a Digital ID Photo to an Application Portal: Flow, Error Messages and Retries — customer reviews
-
★★★★★
The DS-160 upload kept failing on format. A square JPEG from here went through on the first try.
-
★★★★★
UKVI would not take my PNG. Downloaded a jpeg instead and the application moved on.
-
★★★★★
My front-camera shot was mirrored and got refused. Reshot with the rear camera and it passed.
-
★★★★★
I had renamed a HEIC file to .jpg and could not understand the error. This page explained it in one paragraph.
-
★★★★★
Good to learn that ImmiAccount does not show uploaded files back. I kept my copy because of this guide.
-
★★★★★
The Canada portal complained about the background, not the file. Knowing the difference saved me a reshoot.
Is your photo ready?
Skip the photographer; take your photo at home, run the compliance check and download your print-ready photo in seconds.
- No photographer needed
- Free
- No sign-up
- Results in seconds